Saturday, November 30, 2013

Sill seam, vapor barrier, and finally, plywood floor!

The following steps happened pretty quickly, and the wind was increasing steadily, so photos are a bit sparse.
After cleaning up the scraps of cured spray foam from the previous steps, and ensuring no insulation (or foam) was higher then the metal framing of the trailer, I applied sill seam (a flat, spongelike polyethylene material) to all the metal framing.
This will act as a thermal barrier to reduce the transfer of cold temperatures from the metal framing to the plywood subfloor. I just taped it down every few feet since the plywood, once installed, will hold it firmly in place.
Then came the plastic vapor barrier, as added insurance against moisture intrusion from below, with some 2x4's to keep it from blowing away until the plywood subfloors go down.
The 3/4" plywood sheets had already been cut to length, notched for the threaded hold-down rods and fenders,
and test fitted prior to the installation of the sill seam and vapor barrier, since the plywood is heavy and rough, and would have torn these softer materials. So suddenly, and somewhat anticlimactically, the plywood floors are finally, and gently, lowered into place (thanks Marsha!) and it looks like a trailer ready for a house!
I used #14 (which are 1/4" diameter) self tapping screws, 1 3/4" long, to fasten the plywood floor to the steel framing.
I was skeptical that they would pierce the nearly 1/4" thick steel framing without my first drilling a pilot hole, but lo and behold, they worked like a charm. They have a drill bit point at the tip which makes a pilot hole, and two wings to clear the metal shavings from the hole (which break off once used), and then they proceed to cut threads in the steel and screw themselves in. A real time saver!

Now I'm ready to cut the 2x4 sills and start laying out the stud locations.

Saturday, November 23, 2013

Floor insulation.

Next, it's time to prepare the trailer for the floor insulation. I started by vacuuming the bays, to remove all the leaves, dirt, etc.
Then, to make sure there won't be any water penetration from below (especially while driving on wet roads), I applied silicone caulk to all the seams. (I wiped them with an acetone soaked cloth first, to remove any grease or oil).
Here is the best caulk smoothing tool ever invented.
 I wanted to be thorough in the fight against water, so I caulked the fascia/trailer seams, and around the threaded rods as well.


The rigid foam insulation was recycled from a different project, so it came in pieces that had to be fit together in jigsaw fashion. I ripped each sheet on the table saw to the correct width for its bay (there were several different sized bays), then test fitted them for size.
Some of the insulation was too thick for the bays (which are 3" tall), so it had to be "planed". The method I arrived at, (with inspiration from LH), was to construct a jig with 3" tall walls, and cut across it with an antique 2 man saw. It took some elbow grease, but worked pretty well. (Sometimes, those old things in the barn are useful!)
The insulation was returned to the bays, and 5/16" shims were installed around the edges to maintain a space for the 1/4" nozzles of the expanding foam spray cans. The expanding foam will not only fill in the remaining voids, but also lock the rigid sheets into place.
 Weights were placed on the insulation to prevent the expanding foam from creeping underneath the sheets and lifting them (hmm, how do I know that might happen?) and then the perimeter of each bay was filled with spray foam.
It was colder than recommended for the application of expanding foam, so I borrowed a bucket of water from the hot tub to keep the cans warm.
The (nearly) end result:

I removed the excess foam, once cured, with a flat-bladed shovel after this photo was taken.
Next up: Sill seam, vapor barrier, and finally, plywood floor!

Sunday, November 10, 2013

Work begins! Fascia installation.

After arranging a majority of my waterfowl into a parabola, I was finally able to begin work on the tiny house, or more accurately, the trailer beneath the tiny house. The first order of business was to remove all of the lights around the perimeter, as they are in the way of the fascia boards (aka skirting), which will partially hold up the walls and allow for the attachment of subsequent sheathing and siding.

Unfortunately, the wires had to be cut for the lights to be removed. (quick disconnect fittings would be helpful here). You can also see the wires were passed through raw-edged metal holes during installation at the factory. Not a good idea, as  the insulation on the wires is more likely to be skinned (causing short circuits) as the wires might rub 
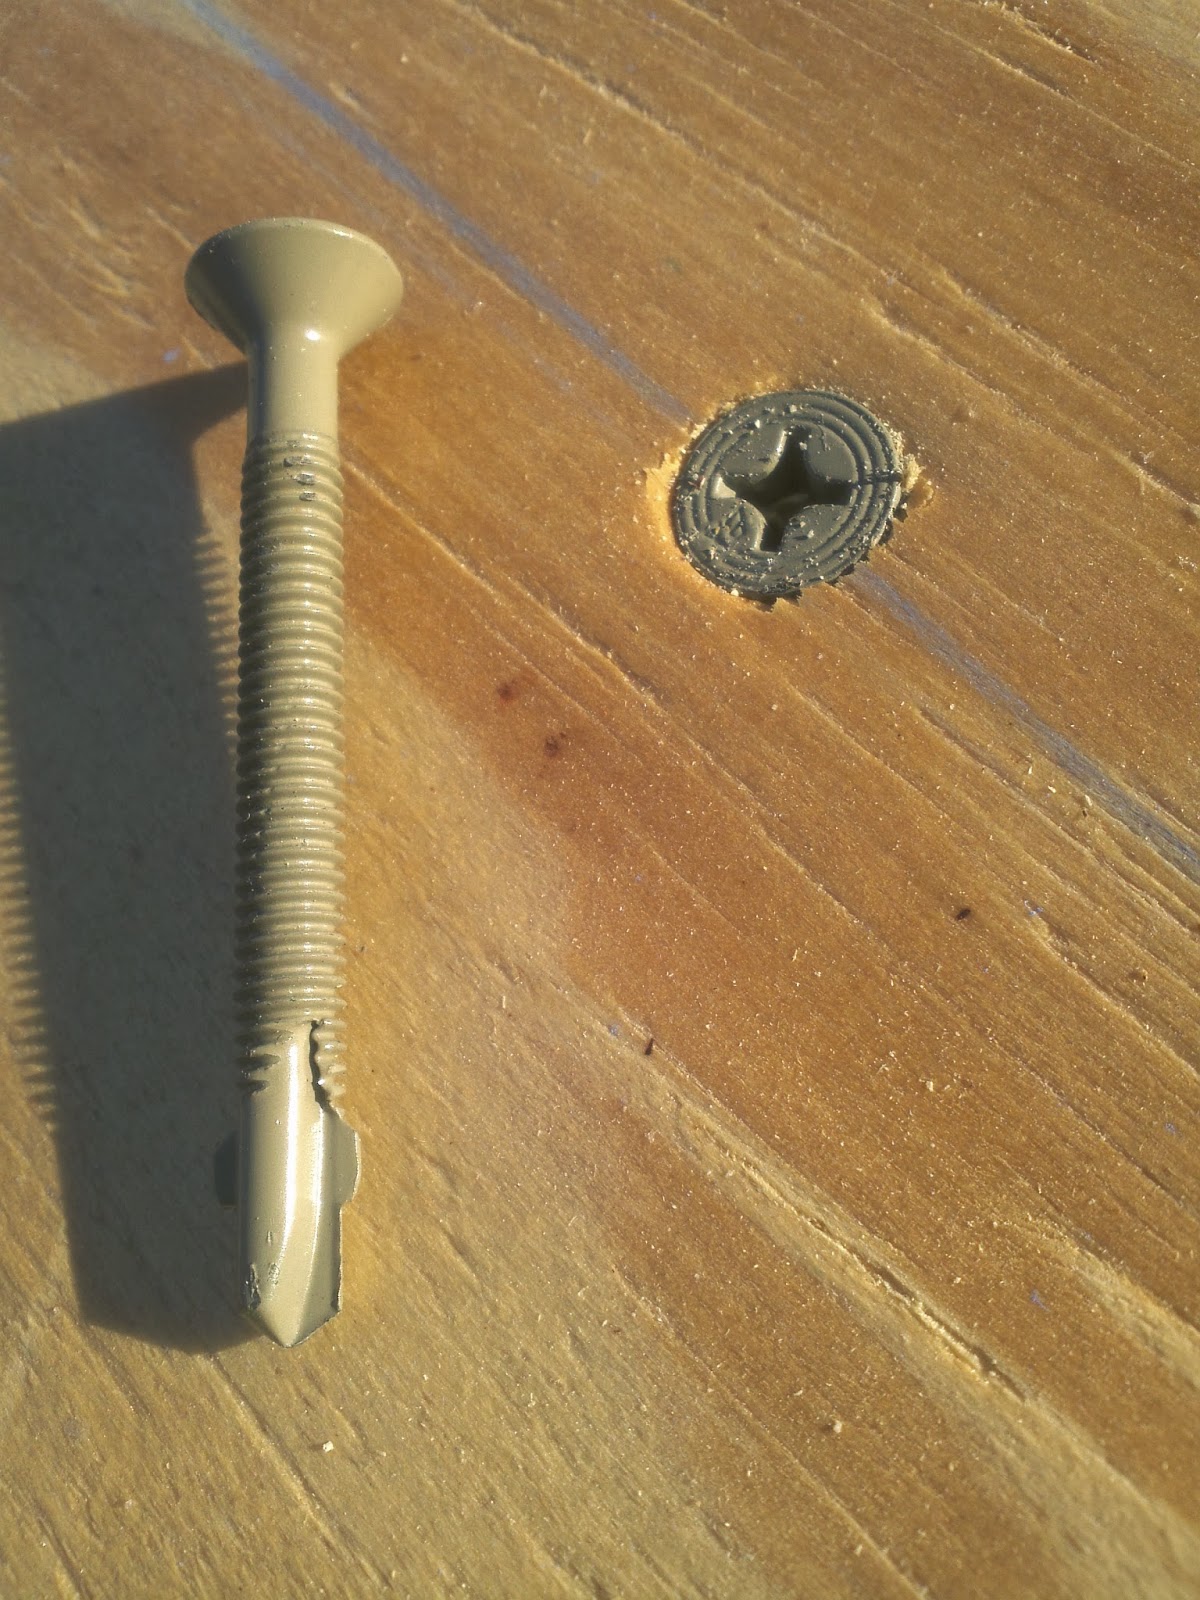
while the house is in transit. I'll fix that with rubber bushings.
Like the one below. It's pressed into the hole, and protects the wire from the sharp edges of the hole. In this example the wire could not be removed from the hole without losing it in the bowels of the trailer, so the bushing had to be sliced open, passed over the wire, and then pressed into the hole. Still, pretty easy.

The wires on the back of the taillights had been pinched against the trailer, as they were too big to fit into the grooves designed to hold them. These lights will probably need to be replaced since the damage is too close to the source of the wires to allow repairs.
 
Next comes the attachment of the 2x6 fascia boards. Four of the boards abut the curved fender, so I cut their ends to match the fender's radius. While this isn't really necessary, as the fascia will be concealed by the siding, it's good practice to prepare for the siding application. Start by cutting one end of the board to the approximate angle, clamping the board to the trailer, and leveling it with the trailer's frame.


Then scribe the curved line onto the board using a spacer and a marker, and cut with a jig saw.

Before re-clamping the board to the trailer for further work, I tacked a spacer to the end to maintain a small gap between the board and fender. This should help to avoid any possible scraping of the fender during road trips, and allow the boards to dry out thoroughly after rain.


The fascia boards also have to be notched (dadoed) to fit over the 5/8" threaded rods welded to the trailer, which allow the house to be bolted to the trailer. The dadoes can be made easily with a circular saw. So, re-clamp the board to the trailer and mark the location of the threaded rod with a square...


Transfer the lines to the inside of the board...
Make close, parallel cuts across the board, with a circular saw set to cut 5/8" deep...
Break out the wood with a chisel...
Clean up the dado with the chisel, and voila!
Just for fun, I like to cut at least one dado on the wrong side of the fascia board, after having cut the radiused end, and then try to find another place I can use the board!

 After the radiused ends and dadoes have been cut, clamp and level the board one final time, and drill the holes for the bolts which will hold the fascia to the trailer.
I drilled outwards through the existing 7/16" holes in the trailer, and then countersunk each hole just enough to allow a flat washer, lock washer, (since the trailer will no doubt experience some vibrations) and nut to be attached.
I used stainless steel hardware as it wasn't that much more expensive than galvanized, and should last a very long time. 

In a few places, the drill would not fit inside the trailer, so I marked the location of the holes with a pen, removed the board, and drilled slightly oversized holes (1/2") to allow for possible alignment errors.


Holes also need to be drilled, before the fascia boards are actually attached, to allow for the passage of wiring through the fascia. Once a board is radiused, dadoed, and cut to length, rest it on top of the trailer frame, in its' correct horizontal position, and transfer the location of the wiring holes onto the boards using a square. (sorry for not having a photo.) Measure the vertical distance from the top of the trailer frame to the hole, and transfer that measurement to the board. I drilled a 7/8" hole, generous enough to allow for possible alignment errors, and also not interfere with the rubber grommet inserted into the hole.

The final result!

Next up, insulation preparation and installation!

Saturday, November 2, 2013

"The new phone book's here!" or "The Arrival of the Queen of Sheba!" or "Trailer Talk."

After about 2 months of waiting, ("It should be here in the next couple of weeks... It should be here in the next couple of weeks... It should be here in the next couple of weeks...") the trailer has finally arrived, and mostly in good shape.
There was only some minor damage; a few scuffs, a small dent, and a missing lens to a running light, but overall it appears to have made the trip halfway across the country rather well. It is certainly solid, which is very good news, as a house will be built on it. Now I have no more excuses for not working on it! Stay tuned.